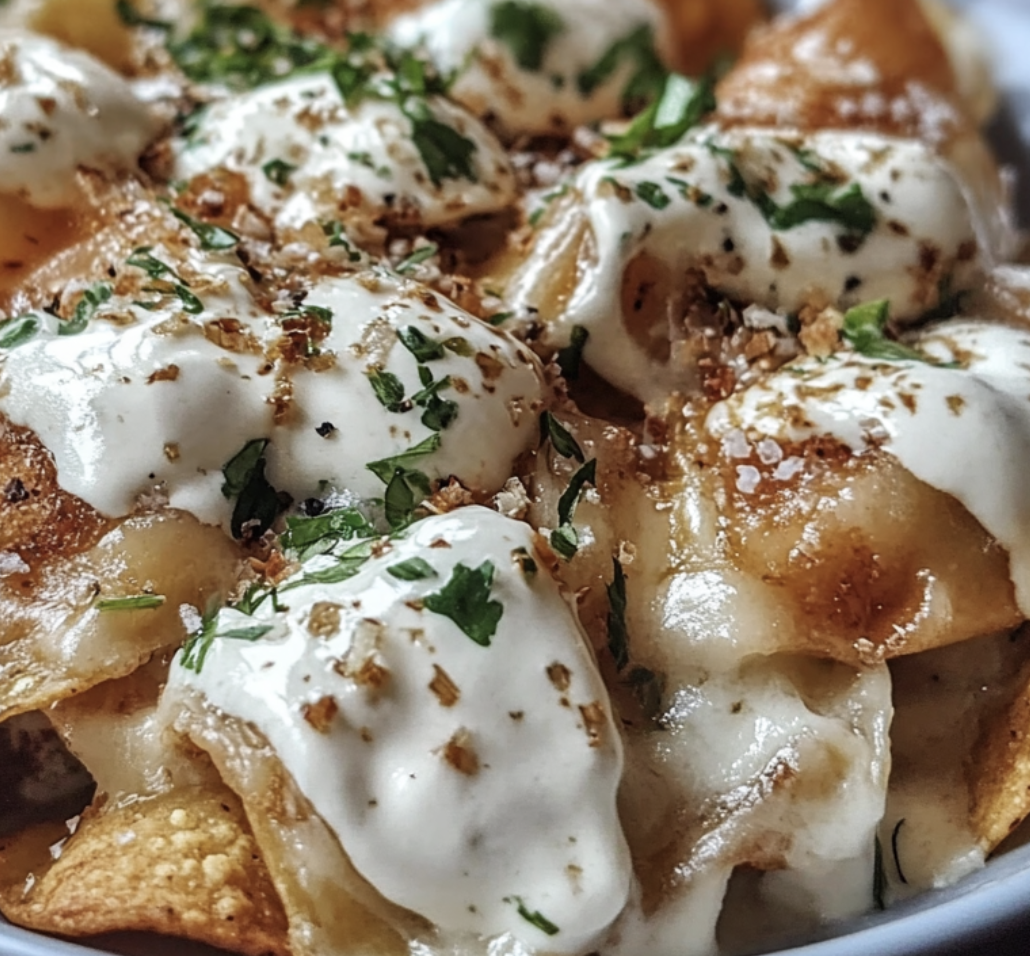
If you love pierogies and nachos, this recipe is the best of both worlds. Pierogi Nachos transform classic potato-and-cheese pierogies into a fun, shareable dish loaded with melty cheese, crispy bacon, and all your favorite toppings. They’re crunchy on the edges, soft in the center, and packed with bold, comforting flavor in every bite.
Perfect for game day, parties, movie nights, or an indulgent weekend dinner, pierogi nachos are easy to make and guaranteed to disappear fast.
Why Pierogi Nachos Are So Popular
A Fun Twist on Two Classics
This recipe combines the hearty comfort of pierogies with the irresistible, loaded style of nachos—no chips required.
Perfect for Sharing
- Crowd-pleasing appetizer or meal
- Customizable with endless toppings
- Oven-baked or air-fryer friendly
- Ready in under 30 minutes
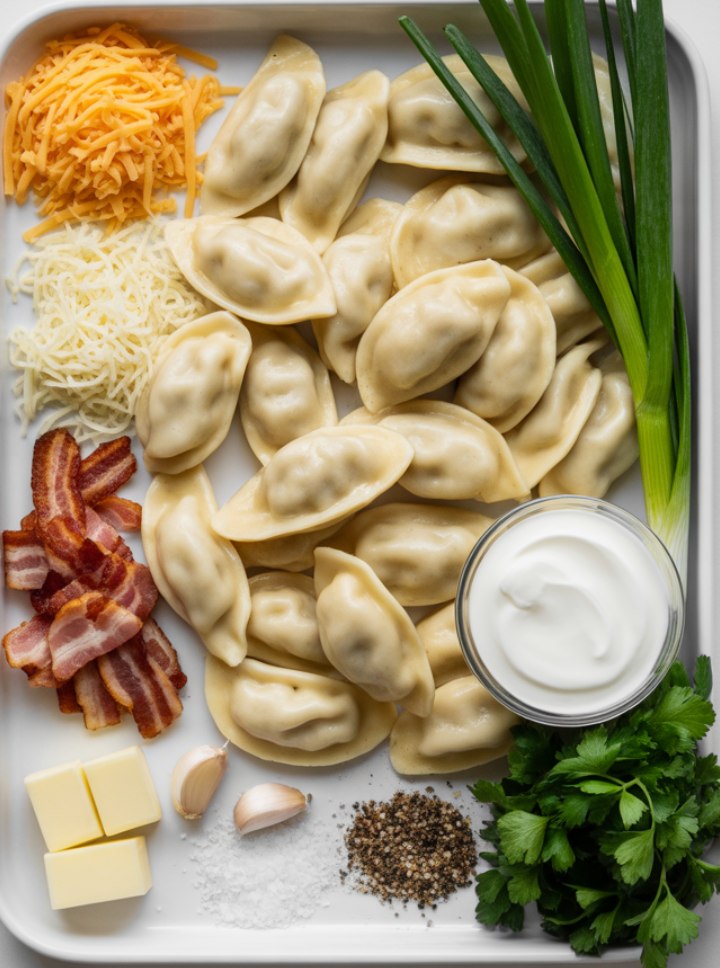
Ingredients You’ll Need
Pierogi Nachos Ingredients Table
| Ingredient | Quantity | Purpose |
|---|---|---|
| Frozen potato & cheese pierogies | 16–20 oz | Base |
| Olive oil or melted butter | 2 tbsp | Crisping |
| Shredded cheddar cheese | 1½ cups | Cheesy layer |
| Mozzarella or Monterey Jack | 1 cup | Melt & stretch |
| Bacon (cooked & crumbled) | 6–8 slices | Smoky crunch |
| Green onions (sliced) | ¼ cup | Fresh bite |
| Sour cream | For serving | Creamy topping |
| Ranch or garlic sauce | Optional | Extra flavor |
| Jalapeños | Optional | Heat |
| Salt & black pepper | To taste | Seasoning |
How to Make Pierogi Nachos
1. Crisp the Pierogies
Preheat oven to 400°F (205°C). Arrange frozen pierogies on a baking sheet. Brush with olive oil or melted butter and season lightly with salt and pepper.
Bake for 18–22 minutes, flipping halfway, until golden and crispy on the edges.
👉 Tip: Crisp pierogies first so they don’t get soggy under toppings.
2. Add the Cheese
Remove the tray from the oven and sprinkle cheddar and mozzarella evenly over the pierogies.
Return to the oven for 5–7 minutes, just until the cheese is fully melted and bubbly.
3. Load the Toppings
Top with crumbled bacon, sliced green onions, and jalapeños if using. Add toppings immediately while the cheese is hot so everything sticks.
4. Serve
Drizzle with ranch or garlic sauce and serve hot with sour cream on the side.
Tips for the Best Pierogi Nachos
Pro Tips
- Use sharp cheddar for bold flavor
- Don’t overcrowd the pan
- Serve immediately for best texture
- Use parchment paper for easy cleanup
Common Mistakes to Avoid
- Skipping the crisping step
- Adding toppings before cheese melts
- Overbaking after cheese is added
Variations & Substitutions
Easy Customizations
- Add sautéed onions or mushrooms
- Use pulled chicken or kielbasa
- Swap bacon for turkey bacon
- Add buffalo sauce for heat
Vegetarian Options
- Skip bacon and add extra cheese
- Use caramelized onions and peppers
- Add black olives or corn
What to Serve With Pierogi Nachos
- Cold beer or soda
- Simple green salad
- Pickles or sauerkraut
- Extra dipping sauces
Storage & Reheating
Storage
Best enjoyed fresh, but leftovers can be refrigerated for 1–2 days.
Reheating
Reheat in the oven or air fryer to restore crispness. Avoid microwaving if possible.
Frequently Asked Questions
Can Pierogi Nachos be made in the air fryer?
Yes. Cook pierogies at 380°F for 10–12 minutes, shaking halfway, then add cheese.
Do I need to boil pierogies first?
No. Baking or air frying from frozen works perfectly.
Can I make Pierogi Nachos gluten-free?
Yes, if using gluten-free pierogies.
Are pierogi nachos filling enough for dinner?
Absolutely—add protein like bacon or chicken to make it a full meal.
Conclusion
If you’re looking for a fun, indulgent dish that’s easy to make and impossible to resist, Pierogi Nachos are the answer. Crispy, cheesy, and endlessly customizable, they’re the ultimate comfort snack for sharing—or keeping all to yourself.