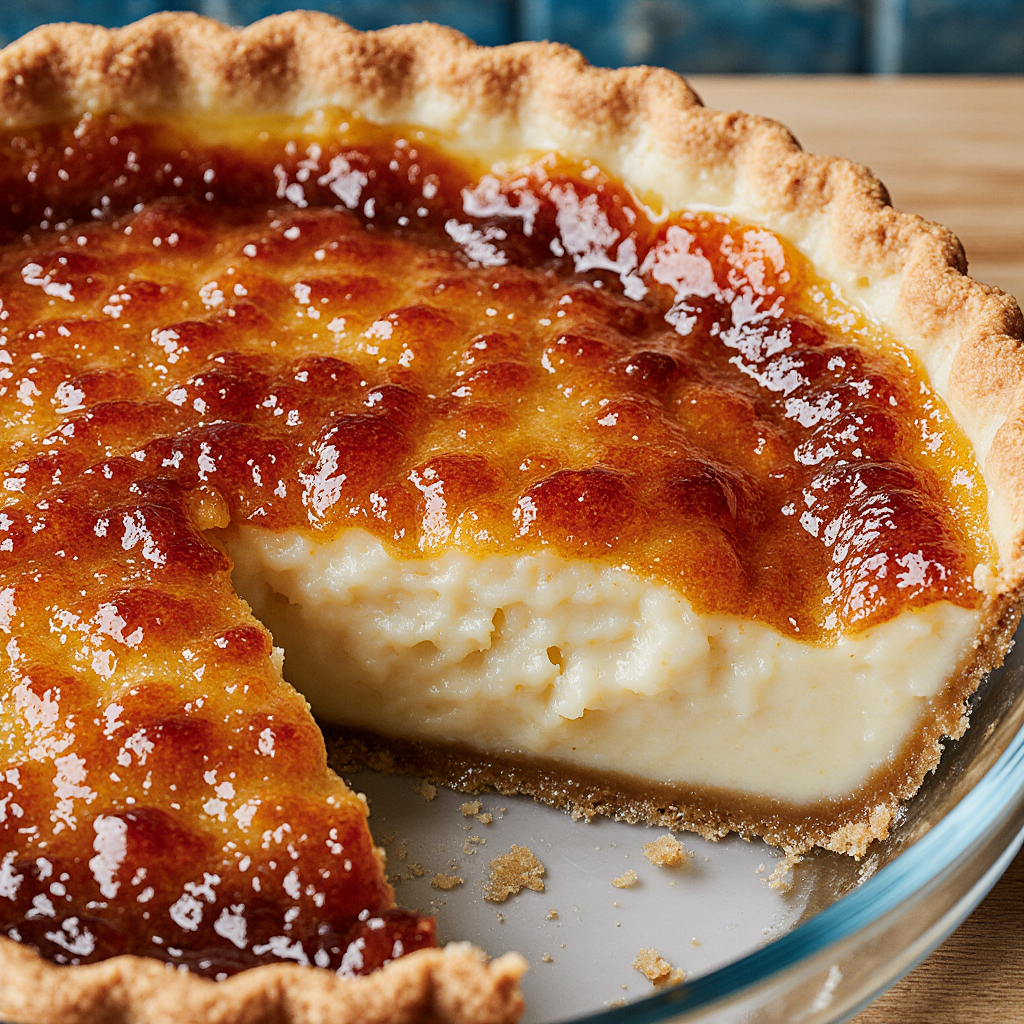
This Old-Fashioned Buttermilk Pie is a Southern classic that proves simplicity is often the key to perfection. With its silky custard filling, crisp golden crust, and delicate balance of sweet and tangy flavors, it’s the kind of dessert that feels nostalgic, comforting, and irresistibly timeless.
Every bite melts in your mouth, offering a smooth, creamy texture that’s lightly caramelized on top and rich with buttery flavor underneath. While it may look humble, this pie is full of charm — the kind of old-fashioned dessert your grandmother might have baked for Sunday supper or holiday gatherings.
Even better, it requires just a handful of pantry staples and minimal effort. Whether served warm with whipped cream or chilled straight from the fridge, this pie never fails to impress.
Why You’ll Love This Old-Fashioned Buttermilk Pie
You’ll love this recipe because it’s simple, elegant, and deeply comforting. Made from everyday ingredients like eggs, sugar, and buttermilk, it transforms into a smooth, custardy masterpiece that tastes far more sophisticated than it looks.
Additionally, it’s an incredibly forgiving dessert — no complicated steps, no fancy tools, and no need for perfection. The ingredients do all the work, creating a pie that’s rich yet balanced, with a hint of tang that keeps each bite refreshing instead of overly sweet.
Furthermore, this recipe is perfect for all occasions. From holiday tables to casual weeknight desserts, it’s one of those pies that feels right anytime.
Why You Should Try This Recipe
If you love desserts that remind you of simpler times, this Buttermilk Pie is a must-try. It has the creamy consistency of a custard pie, the sweetness of a sugar pie, and the tangy complexity that makes Southern baking so beloved.
Moreover, it’s budget-friendly and bakes beautifully with basic ingredients you likely already have. You can serve it as is or dress it up with fruit compote, whipped cream, or a dusting of powdered sugar.
And since it keeps well in the refrigerator, it’s a fantastic make-ahead dessert — perfect for when you want something that tastes freshly baked even a day later.
Ingredients You’ll Need
For the Pie Crust
- 1 unbaked 9-inch pie crust (store-bought or homemade)
For the Buttermilk Filling
- 1 ½ cups granulated sugar
- 3 large eggs
- ½ cup unsalted butter, melted and slightly cooled
- 3 tablespoons all-purpose flour
- 1 cup buttermilk
- 1 teaspoon vanilla extract
- 1 tablespoon lemon juice (optional, for added brightness)
- ¼ teaspoon salt
- Ground nutmeg or cinnamon, for garnish (optional)
How to Make Old-Fashioned Buttermilk Pie (Step-by-Step)
1. Preheat the Oven
Begin by preheating your oven to 350°F (175°C). Place your unbaked pie crust into a 9-inch pie dish, crimp the edges, and set it aside while you prepare the filling.
2. Mix the Sugar, Butter, and Eggs
In a large bowl, whisk together the sugar and melted butter until smooth. Add the eggs one at a time, whisking well after each addition. The mixture should be glossy and slightly thickened.
3. Add the Dry Ingredients
Sprinkle in the flour and salt, whisking gently until fully incorporated. The flour helps give the filling a velvety structure once baked.
4. Stir in the Buttermilk and Flavorings
Next, pour in the buttermilk, vanilla extract, and lemon juice (if using). Whisk until the filling is smooth and creamy. The mixture will be thin — don’t worry, it will set beautifully in the oven.
5. Pour and Bake
Pour the filling into the prepared crust, smoothing the top with a spatula. Place the pie on the center rack and bake for 50–60 minutes, or until the center is set and the top is lightly golden. If the crust begins to brown too quickly, cover the edges with foil.
6. Cool and Serve
Allow the pie to cool completely at room temperature before slicing. For best results, chill it in the refrigerator for at least 2 hours before serving. Sprinkle with a pinch of nutmeg or powdered sugar for a classic touch.
10 Tips for the Best Old-Fashioned Buttermilk Pie
- Use real buttermilk for authentic flavor and tang — not a substitute.
- Whisk gently to avoid air bubbles in the custard.
- Use melted but slightly cooled butter to prevent curdling.
- Add lemon juice for a bright, subtle citrus note.
- Don’t overbake; the center should jiggle slightly when done.
- Let it cool completely before slicing for clean cuts.
- Chill overnight for a firmer texture and richer taste.
- Top with whipped cream or berries for a fresh finish.
- Use a glass pie dish for even baking and a crisp crust.
- Dust with nutmeg or cinnamon before baking for extra warmth.
10 Variations & Substitutions
- Lemon Buttermilk Pie: Add zest and extra lemon juice for brightness.
- Coconut Version: Mix in ½ cup shredded coconut for tropical flair.
- Chocolate Buttermilk Pie: Add ¼ cup cocoa powder to the filling.
- Maple Twist: Substitute ¼ cup sugar with pure maple syrup.
- Brown Butter Version: Use browned butter for a nutty depth.
- Mini Pies: Make smaller versions using tart pans or a muffin tin.
- Nutmeg Lovers: Add extra nutmeg or cardamom for warm spice.
- Gluten-Free: Use a gluten-free crust and 1:1 gluten-free flour blend.
- Citrus Cream Pie: Replace lemon juice with orange or lime juice.
- Classic Sugar Pie Style: Omit lemon for a more custard-forward sweetness.
What to Serve With Old-Fashioned Buttermilk Pie (Step-by-Step)
- Serve with a dollop of whipped cream for classic simplicity.
- Add fresh berries for color and freshness.
- Pair with coffee or sweet tea for a true Southern experience.
- Serve alongside ice cream for a rich contrast.
- Drizzle caramel or berry sauce for presentation flair.
Storage & Reheating Tips (Step-by-Step)
To Store
Cover the pie loosely with plastic wrap or foil. Refrigerate for up to 4 days.
To Freeze
Wrap tightly in plastic wrap and aluminum foil, then freeze for up to 2 months. Thaw overnight in the refrigerator before serving.
To Serve Chilled or Warm
For a cool custard texture, serve straight from the fridge. To enjoy it warm, heat individual slices in the microwave for 10–15 seconds.
Recipe FAQs
1. Can I use low-fat buttermilk?
Yes, but full-fat buttermilk gives the best texture and richness.
2. Can I make it without lemon juice?
Absolutely — it will still have a lovely tang from the buttermilk alone.
3. Why did my pie crack?
It may have baked a bit too long. Remove it when the center is slightly wobbly.
4. Can I make it ahead of time?
Yes! It tastes even better the next day after chilling overnight.
5. Can I use a pre-baked crust?
Yes, just reduce the baking time by 5–10 minutes.
6. What does buttermilk pie taste like?
It’s creamy, buttery, and slightly tangy — similar to custard but lighter.
7. Can I use margarine instead of butter?
Butter is best for flavor, but margarine works in a pinch.
8. How do I prevent soggy crust?
Bake on a lower oven rack or pre-bake the crust slightly.
9. Can I double the recipe?
Yes — bake in two pie dishes or a larger 13×9-inch pan.
10. Can I serve it warm?
Yes, but allow it to set at least 30 minutes after baking before slicing.