If you are looking for a bright, playful, and easy Easter dessert, these Easter Jello Cups are the perfect treat to make. Colorful layers of fruity gelatin, creamy sweetened condensed milk, fluffy whipped topping, and festive Easter candy come together to create a dessert that is fun, eye-catching, and absolutely perfect for spring celebrations. These cups are cheerful, refreshing, and simple enough to make for family gatherings, Easter brunch, classroom parties, or holiday dessert tables.
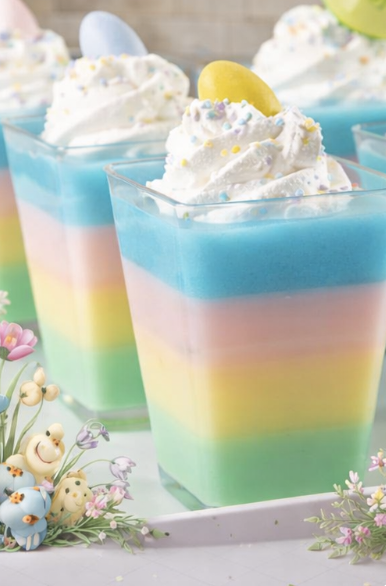
What makes these Easter Jello Cups so special is their beautiful pastel rainbow look. With Island Pineapple, Lime, Pink Starburst, and Berry Blue Jell-O, each layer brings a different flavor and color that makes the dessert feel festive and magical. The sweetened condensed milk adds a creamy contrast, while the whipped topping and Cadbury Mini Eggs on top make every cup look extra adorable and party-ready.
These cups are especially great because they can be made ahead, which makes holiday prep much easier. Once chilled, they hold their shape beautifully and are ready to serve straight from the fridge. Whether you are making them for kids, guests, or just for fun, these easy Easter Jello Cups are guaranteed to add color and joy to your dessert spread.
Why You’ll Love These Easter Jello Cups
There are so many reasons to love these Easter Jello Cups. First, they are incredibly festive and colorful. The bright pastel layers instantly make them look like an Easter dessert, and they fit perfectly into spring celebrations.
Another reason to love this recipe is how fun and refreshing it is. Unlike heavier cakes or rich baked desserts, these Jello cups feel light, cool, and fruity. The creamy sweetened condensed milk and whipped topping help balance the fruity gelatin layers, giving the dessert a smooth and fluffy finish.
They are also easy to portion and serve. Since everything is made in individual cups, there is no slicing or scooping needed. This makes them a perfect choice for parties, dessert trays, school events, or family gatherings where you want something neat, cute, and easy to grab.
Why You Should Try This Recipe
You should try this recipe because it is one of the easiest ways to make a dessert that looks festive and impressive without complicated baking. If you want something playful, colorful, and perfect for Easter, these Easter Jello Cups check every box.
This dessert is also very family-friendly. Kids love the bright colors and candy topping, while adults appreciate the nostalgic, fruity, creamy flavor. Because they are served in individual portions, they also make entertaining easier and cleaner.
If you enjoy easy no-bake Easter desserts that can be made ahead and decorated with fun spring toppings, this recipe is definitely worth saving.
Ingredients You’ll Need
- 1 box Island Pineapple Jell-O
- 1 box Lime Jell-O
- 1 box Pink Starburst Jell-O
- 1 box Berry Blue Jell-O
- 1 can sweetened condensed milk
- 8 cups water
- 19 Cadbury Mini Eggs
- Pastel nonpareil sprinkles
- 1 tub whipped topping
Ingredient Notes
Using a variety of colorful Jell-O flavors gives these cups their bright layered Easter look. Sweetened condensed milk adds a creamy sweetness that pairs beautifully with the fruity gelatin. Whipped topping makes the final dessert extra soft and festive, while Cadbury Mini Eggs and pastel sprinkles give the perfect Easter finishing touch.
How to Make These Easter Jello Cups
Step 1: Prepare the Jello Layers
Start by preparing each box of Jell-O separately according to your layering plan. Dissolve each flavor in hot water until fully mixed, then add cold water as needed. Keep the colors separate so each one stays bright and distinct.
If you want clean layers, work one flavor at a time and allow each layer to chill before adding the next. This takes a little more time, but it gives the prettiest striped Easter look.
Step 2: Make the Creamy Layer
In a bowl or measuring cup, combine the sweetened condensed milk with part of the water mixture to create a creamy layer. This helps break up the bright gelatin colors and gives the dessert a softer pastel look between layers.
The creamy mixture adds sweetness and contrast, making the cups look even more festive and balanced.
Step 3: Layer the Cups
Pour a small amount of your first Jell-O flavor into each serving cup. Place them in the refrigerator and chill until the layer is set enough to hold the next one.
Continue layering the different Jell-O flavors, alternating with the creamy condensed milk layer if desired. Repeat until the cups are filled and all the colors are used. The more defined the layers, the prettier the final presentation will be.
Step 4: Chill Until Fully Set
Once all the layers are added, place the cups in the refrigerator until fully chilled and set. This step is important because it gives the Jello time to firm up completely and makes the cups easier to top and serve.
For best results, let them chill for several hours or until the layers feel fully firm.
Step 5: Add the Whipped Topping
Once the Jello cups are fully set, top each one with a generous dollop of whipped topping. You can spoon it on casually or pipe it on for a prettier, bakery-style finish.
The whipped topping adds a soft, fluffy texture that pairs perfectly with the fruity and creamy layers underneath.
Step 6: Decorate for Easter
Finish each cup with Cadbury Mini Eggs and a sprinkle of pastel nonpareils. This makes the cups look extra festive and gives them that perfect Easter dessert table feel.
Serve chilled and enjoy these cute, colorful spring treats.
Nutritional Information
Nutritional values are approximate and may vary depending on portion size and exact topping amounts.
Per serving:
- Calories: 180–260
- Carbohydrates: 28–40g
- Fat: 5–9g
- Protein: 2–4g
- Sugar: 22–32g
- Sodium: 70–140mg
Tips for the Best Easter Jello Cups
For the best Easter Jello Cups, let each layer set enough before pouring in the next one. If you rush the process, the colors may blend together instead of creating clean, pretty stripes. Even a partial set helps keep the layers more distinct.
Use clear cups if possible. This lets the beautiful pastel colors show through and makes the dessert much more eye-catching on a party table. Individual plastic dessert cups or small glass jars work especially well.
When adding the whipped topping, wait until the Jello is fully chilled and set. This helps the topping sit nicely on top without sliding or melting into the layers. For an extra polished look, pipe the topping with a star tip.
Be gentle when decorating with Mini Eggs and sprinkles. A small amount goes a long way and keeps the cups looking cute instead of overloaded. The goal is a festive finish that still lets the colors underneath shine.
Finally, make these ahead if you can. Jello desserts are often better after they have had plenty of time to chill, and making them early can make Easter day much easier.
Variations & Substitutions
These Easter Jello Cups are easy to customize.
- Use different Jell-O flavors for a different color palette
- Skip the creamy layer if you want only bright fruit layers
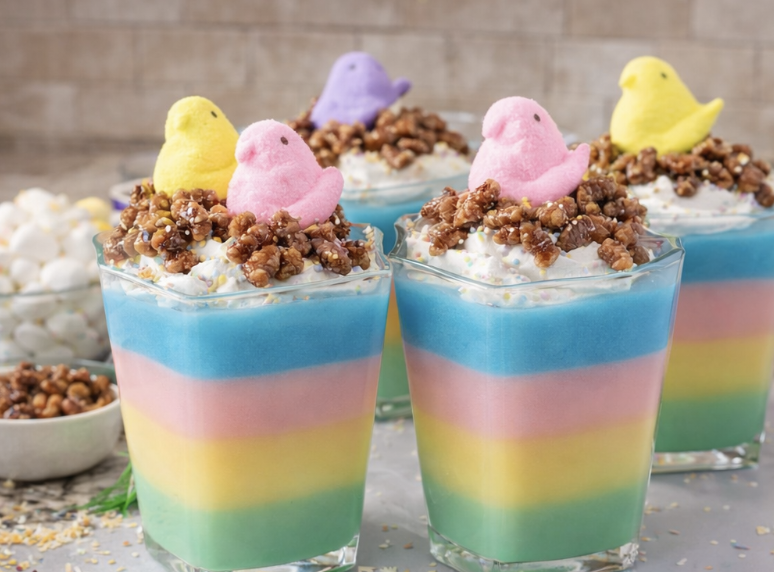
- Swap whipped topping for homemade whipped cream
- Use jelly beans instead of Cadbury Mini Eggs
- Add coconut flakes on top for a nest-like look
- Serve in one large trifle dish instead of individual cups
- Use clear plastic party cups for easy holiday serving
These small changes make the recipe easy to adapt for different holidays, parties, and flavor preferences.
What to Serve with Easter Jello Cups
These colorful cups pair beautifully with other Easter and spring desserts. Here are a few serving ideas:
- Easter cupcakes
- Sugar cookies
- Fruit salad
- Bunny-shaped brownies
- Lemon bars
- Mini cheesecakes
- Carrot cake
- Easter dessert boards
Because they are light and fruity, they fit especially well alongside richer baked treats.
Common Mistakes to Avoid
One common mistake is not letting the layers set enough before adding the next one. This can cause the colors to mix together instead of staying separated. Patience makes a big difference in the final look.
Another mistake is pouring the next layer too forcefully. A gentle pour helps protect the layer underneath and keeps the dessert looking neat. Pouring over the back of a spoon can help soften the impact.
Using too much whipped topping or too many decorations can also overwhelm the cups visually. Keep the top balanced so the pastel layers remain the star of the dessert.
Another issue is not chilling the cups long enough before serving. If they are not fully set, the texture may be too soft and messy. Give them plenty of time in the refrigerator for the best results.
Finally, avoid using opaque containers. Clear cups show off the layers and make these desserts much prettier for Easter parties.
Storing Tips for the Recipe
Store these Easter Jello Cups covered in the refrigerator until ready to serve.
- Refrigerator: Up to 3 days
- Best texture: Enjoy within 1 to 2 days
- For best presentation: Add whipped topping and candy garnish closer to serving time if possible
Keep them chilled at all times so the layers stay firm and fresh.
Conclusion
These Easter Jello Cups are a bright, fun, and easy dessert that brings instant color to any spring celebration. With fruity gelatin layers, creamy sweetness, fluffy whipped topping, and festive Easter candy on top, they are the perfect no-bake dessert for brunches, parties, classroom treats, or holiday dessert trays.
They are simple to prepare, beautiful to serve, and fun for both kids and adults. If you want an Easter dessert that is cheerful, refreshing, and easy to make ahead, these Jello cups are a perfect choice.
General Information
- Recipe Name: Easter Jello Cups
- Recipe Type: Dessert
- Cuisine: American
- Skill Level: Easy
- Prep Time: 25 minutes
- Chill Time: 4 hours
- Total Time: About 4 hours 25 minutes
- Servings: 12–16 cups
- Calories per Serving: Approximately 180–260
Frequently Asked Questions (FAQ)
Can I make Easter Jello Cups ahead of time?
Yes, these are perfect for making ahead. You can prepare them a day before serving and keep them chilled in the refrigerator.
Do I have to make separate layers?
No, but separate layers create the prettiest Easter look. You can also do simpler sections of color if you want to save time.
Can I use homemade whipped cream instead of whipped topping?
Yes, homemade whipped cream works well, but whipped topping tends to hold up longer in the refrigerator.
How long do Easter Jello Cups last?
They can last up to 3 days in the refrigerator when covered properly.
Can I use other candies on top?
Yes, jelly beans, pastel sprinkles, marshmallows, or mini chocolate eggs all work well for decoration.
What is the best way to serve them?
Serve them cold in clear individual cups so the colorful layers are easy to see and enjoy.