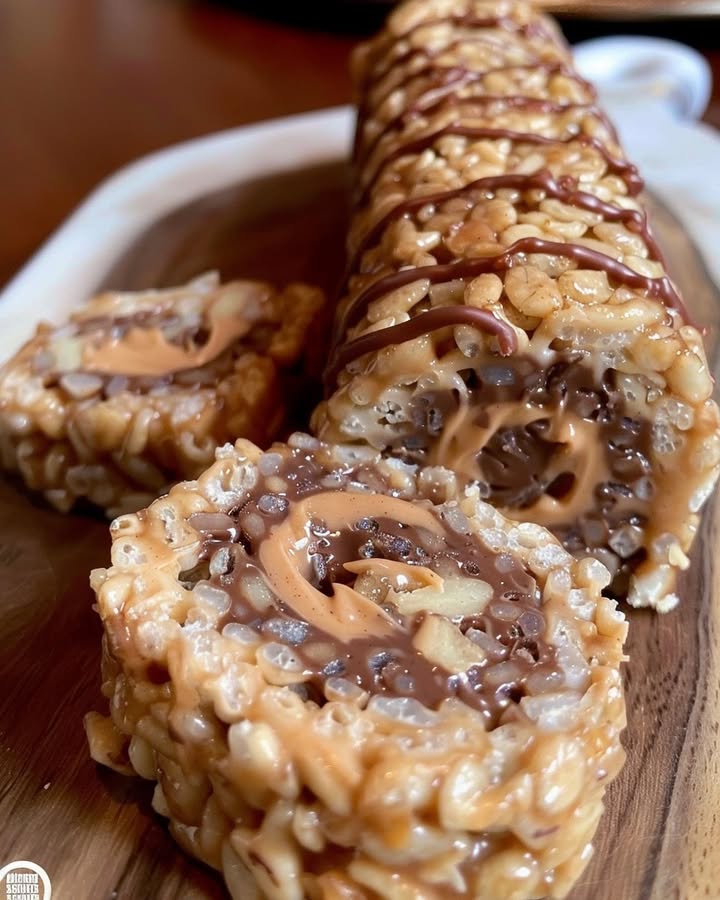
This Chocolate Peanut Butter Rice Krispies Roll is a nostalgic, no-bake dessert that combines the classic crunch of cereal bars with a stunning swirl of chocolate and creamy peanut butter. It’s a delightful twist on the beloved childhood treat — chewy, crispy, and rich, with a beautiful pinwheel presentation that makes it as impressive as it is easy.
Each slice reveals layers of smooth chocolate filling and a peanut butter-infused cereal base that deliver the perfect balance of sweetness and texture. It’s a crowd-pleaser for both kids and adults — ideal for bake sales, lunchbox treats, holidays, or anytime you need a quick dessert that doesn’t require turning on the oven.
Unlike traditional Rice Krispies squares, this version is rolled, not pressed. The process is simple but gives the final dessert an elegant bakery-style appearance. Once chilled, it slices into perfect rounds that look intricate but take less than 30 minutes to make.
Why You’ll Love This Recipe
- No-bake simplicity: Requires only a saucepan and a few basic ingredients.
- Classic flavor pairing: Chocolate and peanut butter blend beautifully for a nostalgic yet indulgent dessert.
- Eye-catching presentation: The swirl effect looks sophisticated on dessert trays or gift platters.
- Kid-friendly and fun to make: Great for little helpers to stir and spread.
- Make-ahead convenience: Stays fresh for days and freezes perfectly.
Ingredients You’ll Need
For the Peanut Butter Base
- 3 cups (about 85 g) Rice Krispies cereal (use fresh, crisp cereal for best texture)
- 1/2 cup (100 g) granulated sugar
- 1/2 cup (120 ml) light corn syrup or honey
- 1/2 cup (125 g) creamy peanut butter
- 1 teaspoon pure vanilla extract
For the Chocolate Filling
- 1 cup (175 g) semi-sweet chocolate chips (or dark chocolate for a richer taste)
- 1/4 cup (60 g) creamy peanut butter
Optional Toppings
- A drizzle of melted chocolate or white chocolate for decoration
- Crushed peanuts or pretzel crumbs sprinkled on top before chilling
How to Make Chocolate Peanut Butter Rice Krispies Roll
Step 1: Prepare the workspace
Line a clean counter or a large baking sheet with parchment or wax paper. This will prevent sticking and make rolling easier later. Lightly grease a rubber spatula or your hands with a bit of oil or butter — the peanut butter base can be sticky.
Step 2: Make the base mixture
In a medium saucepan, combine granulated sugar and light corn syrup. Cook over medium heat, stirring constantly until the sugar dissolves and the mixture starts to bubble gently around the edges. Do not let it boil, as overheating will cause the mixture to harden once cooled.
Step 3: Add peanut butter and vanilla
Remove the saucepan from the heat and immediately stir in the peanut butter and vanilla extract until fully melted and smooth. The mixture should be thick but pourable.
Step 4: Combine with cereal
Place the Rice Krispies cereal in a large mixing bowl. Pour the warm peanut butter mixture over it, stirring quickly and gently to coat every piece. The cereal should look glossy and evenly covered.
Step 5: Shape into a rectangle
Transfer the coated cereal mixture onto the prepared parchment paper. Using a spatula or your greased hands, press it into an even rectangle measuring about 10 x 14 inches and roughly 1/2 inch thick. Work quickly while it’s still warm and pliable.
Step 6: Make the chocolate filling
In a microwave-safe bowl, combine the chocolate chips and 1/4 cup peanut butter. Heat in 20–30 second intervals, stirring after each, until completely melted and silky smooth. Do not overheat — chocolate burns easily.
Step 7: Assemble the roll
Spread the warm chocolate mixture evenly over the flattened cereal layer, leaving about a 1-inch border along one long edge to prevent overflow when rolling. For even spreading, use an offset spatula or the back of a spoon.
Step 8: Roll it up
Starting from the opposite long edge, lift the parchment paper to help you roll the cereal mixture tightly into a log, like a jelly roll or Swiss roll. Apply gentle pressure to keep it firm but avoid cracking. Once rolled, press lightly to seal the seam.
Step 9: Chill to set
Wrap the roll tightly in parchment or plastic wrap and refrigerate for at least 45 minutes, or until firm enough to slice cleanly. Chilling allows the chocolate filling to solidify and hold its shape.
Step 10: Slice and serve
Once set, unwrap and use a sharp knife to cut 1-inch slices. Wipe the knife clean between cuts for neat edges. Serve immediately, or store for later.
Tips for the Best Results
- Temperature control: Do not let the syrup mixture boil — a gentle simmer ensures chewy, not brittle, texture.
- Timing: Roll the mixture while it’s still warm. If it cools too much, it will crack when rolled.
- Even spreading: Use an offset spatula for smooth chocolate distribution.
- Uniform thickness: Press the cereal base evenly to prevent thin edges that might tear.
- Slicing tip: Warm your knife slightly by dipping it in hot water and drying it before slicing — this makes perfect, clean cuts.
- Presentation idea: Drizzle extra melted chocolate or white chocolate zig-zags on top after slicing for an elegant finish.
Variations & Substitutions
- Nut-free version: Replace peanut butter with sunflower seed butter or tahini.
- Flavor twist: Add a teaspoon of espresso powder to the chocolate layer for mocha flavor.
- Crunch boost: Mix in 1/4 cup chopped pretzels or roasted peanuts before shaping.
- White chocolate version: Use white chocolate chips for a lighter swirl.
- Double chocolate: Add 1 tablespoon of cocoa powder to the base for a darker, richer look.
What to Serve With
These rolls are delicious on their own but pair perfectly with cold milk, hot cocoa, or coffee. They make a standout addition to dessert platters, cookie tins, and holiday treat boxes. For a fancier presentation, serve slices on a platter with small clusters of fruit or nuts.
Storage
- Room temperature: Store slices in an airtight container for up to 5 days. Separate layers with parchment paper to prevent sticking.
- Refrigerator: Keeps fresh for up to 2 weeks; let sit at room temperature for 15 minutes before serving for best texture.
- Freezer: Freeze the whole roll or individual slices, wrapped tightly, for up to 2 months. Thaw in the refrigerator before slicing or serving.
Recipe FAQs
Why did my roll crack when I tried to roll it?
The mixture cooled too long before rolling. Next time, roll it while the base is still warm and pliable. If it’s already stiff, warm it gently with a hairdryer or in a low oven for a few seconds to soften.
Can I skip the corn syrup?
Yes, honey or golden syrup can replace it, though the final roll will be softer and slightly stickier.
Can I use chunky peanut butter?
You can, but creamy peanut butter gives smoother, more cohesive layers. Chunky will add more texture but may make rolling uneven.
What’s the best way to keep the roll from sticking to my hands?
Lightly grease your palms with butter or oil before pressing or shaping the cereal mixture.
Can I double the recipe?
Absolutely. Instead of one large roll, make two smaller logs for easier handling and faster cooling.
Can I make it dairy-free?
Yes. Use dairy-free chocolate chips and plant-based butter or coconut oil in place of standard butter.
Can I add flavor to the chocolate layer?
Definitely — a touch of cinnamon, espresso powder, or sea salt enhances the richness beautifully.