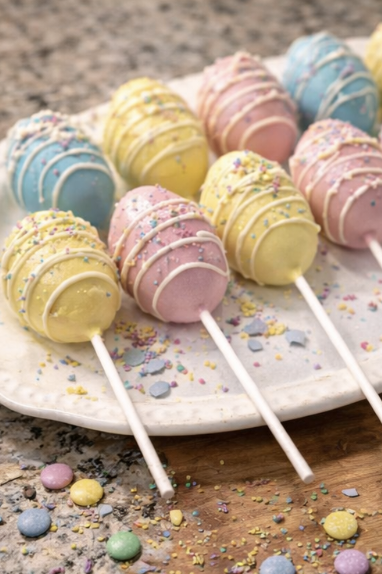
If you are looking for a fun, festive, and adorable Easter dessert, these Easter Egg Cake Pops are the perfect treat to make. They are sweet, colorful, and shaped like little Easter eggs, making them ideal for spring parties, Easter dessert tables, classroom treats, or holiday gift boxes. With their soft cake center, creamy frosting mixture, and candy coating on the outside, these cake pops are just as delicious as they are cute.
What makes these Easter Egg Cake Pops so special is their playful presentation. Instead of traditional round cake pops, these are shaped like Easter eggs, which instantly makes them feel extra festive for the season. They can be decorated in so many fun ways with pastel colors, sprinkles, drizzle, or candy decorations, making them a beautiful addition to any Easter celebration.
These cake pops are also a great way to turn simple cake and frosting into a bite-sized dessert that feels bakery-style without being too complicated. Whether you are making them for kids, guests, or simply because you love cute holiday desserts, these easy Easter Egg Cake Pops are guaranteed to be a hit.
Why You’ll Love These Easter Egg Cake Pops
There are so many reasons to love these Easter Egg Cake Pops. First, they are festive and adorable. Their egg shape and colorful decorations make them perfect for Easter and spring celebrations.
Another reason to love this recipe is the texture. The inside is soft, moist, and sweet, while the outer coating adds a smooth candy shell that gives each bite a satisfying finish. You get that perfect mix of creamy cake filling and crisp coating in every bite.
They are also easy to customize. You can use vanilla cake, chocolate cake, or even funfetti cake, then decorate the outside in pastel shades, drizzle patterns, or sprinkle designs. This makes them fun to create and easy to match with your Easter dessert theme.
Why You Should Try This Recipe
You should try this recipe because it is a fun and creative Easter dessert that always stands out on the table. If you love cake pops or bite-sized desserts, shaping them like Easter eggs gives them an extra seasonal twist that feels special and memorable.
This recipe is also great for parties and gatherings because the cake pops are individually portioned and easy to serve. They work well for dessert trays, holiday treat boxes, bake sales, or party favors. Plus, they are simple enough for beginner bakers once the cake mixture is prepared.
If you want a dessert that is cute, festive, easy to decorate, and loved by both kids and adults, these Easter Egg Cake Pops are definitely worth making.
Ingredients You’ll Need
- 1 baked cake, crumbled
- 1/2 to 3/4 cup frosting
- Candy melts or white chocolate, melted
- Gel food coloring if using white coating
- Cake pop sticks or treat sticks
- Sprinkles, drizzle, or candy decorations for topping
Ingredient Notes
A baked vanilla, chocolate, or funfetti cake works beautifully for this recipe. Frosting helps bind the cake crumbs into a soft, shapeable mixture. Candy melts are often the easiest coating because they set nicely and come in fun colors, while white chocolate can be tinted with pastel gel coloring for a festive Easter look.
How to Make These Easter Egg Cake Pops
Step 1: Crumble the Cake
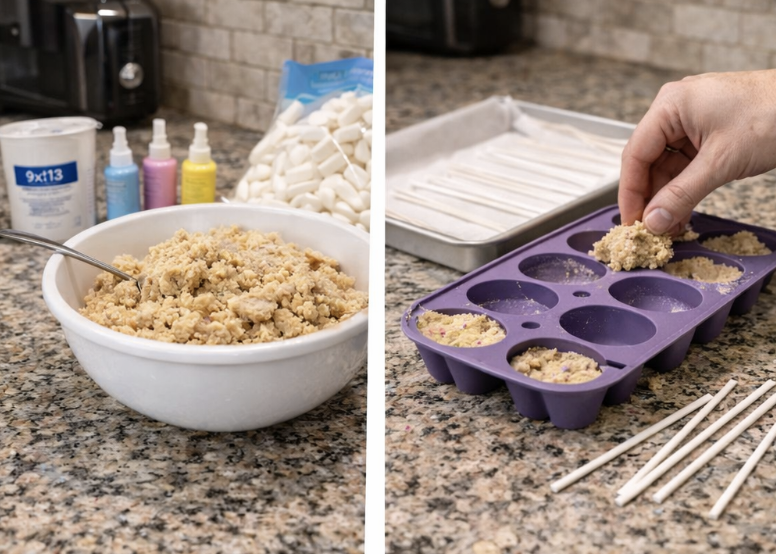
Start by crumbling the baked cake into a large bowl. Break it down until there are no large chunks left and the texture looks fine and even.
This step is important because the cake crumbs need to mix smoothly with the frosting to create a soft, uniform filling.
Step 2: Mix With Frosting
Add the frosting a little at a time and mix until the cake crumbs hold together when pressed. The mixture should be moist and easy to shape, but not overly soft or sticky.
You may not need all the frosting, so add it gradually. Too much frosting can make the cake pops too soft to hold their shape.
Step 3: Shape Into Easter Eggs
Scoop small portions of the cake mixture and shape them into little egg forms with your hands. Try to keep them evenly sized so they look neat and uniform.
Place the shaped cake eggs onto a parchment-lined tray.
Step 4: Chill Until Firm
Transfer the tray to the refrigerator or freezer and chill the cake eggs until firm. This helps them keep their shape and makes them much easier to coat.
A well-chilled cake pop center is much less likely to fall apart during dipping.
Step 5: Prepare the Coating
Melt the candy melts or white chocolate until smooth. If you are using white chocolate and want pastel colors, divide it into bowls and tint with pink, yellow, blue, or purple gel coloring.
Make sure the coating is smooth and fluid enough for dipping.
Step 6: Add the Sticks
Dip the tip of each cake pop stick into the melted coating, then insert it gently into the bottom of each chilled egg shape. This helps the stick stay in place once the coating sets.
Return them to chill briefly if needed so the sticks are secure.
Step 7: Dip the Cake Pops
Dip each cake pop into the melted coating until fully covered. Let the excess coating drip off, then place the cake pop upright or lay it carefully on a lined surface depending on how you want to display them.
Work gently so the egg shape stays intact.
Step 8: Decorate and Set
Before the coating sets, decorate the cake pops with sprinkles, drizzle, stripes, or other Easter-themed decorations. Let them set completely until the outer shell is firm.
Serve and enjoy these cute, colorful Easter treats.
Nutritional Information
Nutritional values are approximate and may vary depending on the cake flavor, frosting, and coating used.
Per serving:
- Calories: 140–220
- Carbohydrates: 18–28g
- Fat: 6–10g
- Protein: 1–3g
- Sugar: 12–20g
- Sodium: 70–140mg
Tips for the Best Easter Egg Cake Pops
For the best Easter Egg Cake Pops, do not add too much frosting to the cake crumbs. The mixture should be just moist enough to hold together. Too much frosting can make the cake pops too soft and difficult to shape or dip.
Chill the egg-shaped cake mixture well before coating. This helps them stay firm and makes the dipping process much easier. If they start to soften while you work, place them back in the fridge for a few minutes.
When melting the coating, make sure it is smooth but not too hot. If it is too thick, dipping becomes harder. If it is too hot, it can soften the cake pops and cause them to slide off the sticks.
Dip the sticks into melted coating before inserting them into the cake eggs. This small step helps keep the cake pops secure and prevents them from falling off later.
For the prettiest look, decorate them with simple pastel drizzle, tiny sprinkles, or mini candy accents while the coating is still wet. This gives them that polished Easter bakery look.
Variations & Substitutions
These Easter Egg Cake Pops are easy to customize.
- Use vanilla, chocolate, strawberry, or funfetti cake
- Swap frosting flavors to match the cake
- Use pastel candy melts for a colorful coating
- Add sprinkles inside the cake mixture for extra fun
- Decorate with stripes, dots, or drizzle patterns
- Make them without sticks as cake truffles
- Use crushed cookies or coconut for extra decoration
These small changes make it easy to match the cake pops to your Easter table or personal style.
What to Serve with Easter Egg Cake Pops
These festive cake pops pair beautifully with other spring desserts. Here are a few delicious serving ideas:
- Easter cupcakes
- Jello cups
- Mini cheesecakes
- Fruit platters
- Sugar cookies
- Brownie bites
- Cheesecake mousse jars
- Easter dessert boards
They also work perfectly in treat bags or dessert gift boxes.
Common Mistakes to Avoid
One common mistake is adding too much frosting to the cake crumbs. This can make the mixture too soft and hard to shape. Add frosting gradually until the texture is just right.
Another mistake is skipping the chill time. Soft cake pops are harder to dip and more likely to fall apart. Chilling makes the process much easier.
Using coating that is too thick can also create problems. It may not dip smoothly and can look heavy on the cake pops. Melt it fully and stir until silky.
Another issue is pushing the sticks too far into the cake eggs or not securing them with melted coating first. A gentle insertion with a coated tip helps the stick stay in place better.
Finally, avoid decorating after the coating has already set. Decorations stick best when added right away.
Storing Tips for the Recipe
Store Easter Egg Cake Pops in an airtight container in the refrigerator.
- Refrigerator: Up to 5 days
- Best texture: Enjoy within 2 to 3 days
- For serving: Let them sit out a few minutes before eating for a softer center
You can also freeze them for longer storage. Thaw in the refrigerator before serving.
Conclusion
These Easter Egg Cake Pops are the perfect spring dessert when you want something cute, festive, and easy to share. With their soft cake center, sweet coating, and colorful Easter decorations, they are fun to make and even more fun to serve.
They are ideal for Easter celebrations, parties, holiday dessert trays, and homemade gifts. If you want a dessert that feels playful, pretty, and delicious, these cake pops are a wonderful choice for the season.
General Information
- Recipe Name: Easter Egg Cake Pops
- Recipe Type: Dessert
- Cuisine: American
- Skill Level: Easy
- Prep Time: 30 minutes
- Chill Time: 1 hour
- Total Time: About 1 hour 30 minutes
- Servings: 12–16 cake pops
- Calories per Serving: Approximately 140–220
Frequently Asked Questions (FAQ)
Can I use boxed cake mix for Easter Egg Cake Pops?
Yes, boxed cake mix works perfectly and makes the recipe even easier.
Why are my cake pops falling off the stick?
This usually happens if the mixture is too soft or the stick was not secured with melted coating first. Chilling well also helps.
Can I make these ahead of time?
Yes, these are great for making ahead and storing in the refrigerator until ready to serve.
Do I have to use sticks?
No, you can skip the sticks and make them as Easter egg cake truffles instead.
Can I freeze Easter Egg Cake Pops?
Yes, they can be frozen in an airtight container and thawed in the refrigerator before serving.
What is the best coating to use?
Candy melts are often the easiest, but white chocolate also works well if melted properly.